Monday, 7 September 2015
Christmas Cards!
Lately I've been on a card-making mission. After not sending any Christmas cards for the past few years, I really want to send them to friends and family this year, but not just the multi pack cards you buy in the shops, handmade cards!
Because I need to have a few to send, I started making them back in August. I used the Kaisercraft Workshop magazines for inspiration as well as Pinterest. I use scrapbooking paper, cardstock, stickers, buttons, ribbons, foam tape, little cutouts that match the paper (elephants, ornaments, etc.).
Here are a few samples of cards I've made lately. First I used a simple navy card, some red/white striped paper and two circles with a pattern on them. The two circles I stuck together to create a 3D ornament, which I then stuck to a piece of card with smaller circles on it. To finish off I used some foam tape on the back of the "Happy Holidays" quote and a piece of ribbon with mistletoe on it (the ribbon is tucked around the back of the card front).
The second card is a burgandy side opening (that is it opens lengthwise) card. The wooden embellishments I bought on special, they have either a star cut-out or are solid. On the solid one I used a rub-on to make it look like an ornament. I cut a piece of gingham-style paper, used foam tape on the back of the "Seasons Greetings" saying and then finished with a sticker of bells.
This card is blue, another side-opening one, with a piece of polka dot paper along the bottom. Three pieces of thin white ribbon from the top down with a green and red sparkly pompom on the bottom of the longer pieces. More foam tape on the back of a gift tag in the shape of an ornament (I received a few of these free with a magazine subscription) and finished with a little white ribbon bow at the top of the gift card.
Left is a white card with a piece of burgandy cardstock and a piece of striped paper on top. More wooden embellishment ornaments, this time with rub-on alphabet to spell J O Y and a rub-on saying at the bottom.
The right card is an embossed card (my first time using them). A ribbon with gingerbread men on the right, again tucked over the top and bottom and stuck to the reverse of the front of the card. A gift ribbon glued on near the top. A white circle of cardstock, a circle of red/white paper and then the word "Believe" rub-on on to a tag.
Finally, red card with a piece of paper - white with green, slightly embossed, shiny Christmas trees on it. The tag was a set I bought for scrapbooking, but repurposed onto a piece of pale green cardstock that was trimmed to 5mm larger than the tag. The "Santa's List" was a rub-on. A piece of pale gold ribbon tucked around the tree paper (stuck behind the paper rather than on the reverse of the card, so it's more hidden). The J O Y are rub-on alphabet again on punched pieces of burgandy paper.
All these cards are quite simple, but look much more hardwork. I can't wait to go through them all again and send them out in the next few months. I've actually now got a collection of about 18 Christmas cards and will be making more throughout the next month or so.
Tuesday, 1 September 2015
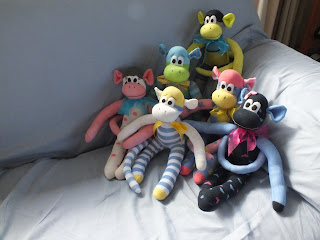
Cancer Society Monkeys
Last year, I made half a dozen sock monkeys for the Cancer Society to sell during Daffodil Day. I wasn't going to this year, however I received a phone call asking if I would make some for this year's sale as well. Below are the 6 I made, I tried to have either yellow, blue or a combination of both since those are the colours of the Cancer Society.
The bunch!
Subscribe to:
Posts (Atom)


